1. Purpose
This summary is to review the related operations of adding practical Nginx. Including three major features of Nginx: load balancing, reverse proxy and dynamic and static separation. Finally, use Nginx to simulate a high-availability scenario to deepen your understanding of Nginx.
2. Basic concepts
2.1 Nginx description
Nginx is a reverse proxy web server for http, which performs well in concurrency and can withstand up to 50,000 concurrency. So it is also favored by many companies. Including Baidu, JD.com, Sina, Tencent, Taobao, etc.
2.2 Reverse Proxy and Forward Proxy
A forward proxy is a proxy client, and the server is insensitive to requests from different clients. A better example is the use of VPN. For example, when we use Google over the wall, it is actually a forward proxy. The user is equivalent to visiting the Google website, but it is actually sent to the VPN server, and the VPN server communicates with Google. Interactive communication, and then return the content to the client. Forward proxying requires client browsers to be configured.

A reverse proxy is just the opposite and is used to proxy the server. The client is indifferent to the server. For example, if a user wants to access multiple tomcat servers on the server, he can access the reverse proxy server, and then the reverse proxy server communicates with tomcat to return the content to the client. So the reverse proxy is the configuration server.

2.3 Load Balancing
Load balancing is equivalent to using the load balancing server to distribute the client’s request to each server according to the load balancing configuration.
2.4 Dynamic and Static Separation
Dynamic and static separation is equivalent to separating the dynamic resources of the server from the static resources, and using nginx to point to different servers.

3. Environment installation
3.1 Nginx installation
1
2
3
4
|
root@agent:/tmp/8081/apache-tomcat-9.0.39/webapps# nginx -t
nginx: [warn] conflicting server name "192.168.2.5" on 0.0.0.0:80, ignored
nginx: the configuration file /etc/nginx/nginx.conf syntax is ok
nginx: configuration file /etc/nginx/nginx.conf test is successful
|
Mainly configure the nginx.conf file. The default running port of nginx is port 80.
3.2 tomcat installation
Download the tomcat compressed file directly, put it in the specified path, and decompress it directly. JDK needs to be installed to run. The operation of tomcat is under the bin path, and the sh file is executed. The default running port of tomcat is port 8080.
1
2
3
|
sudo add-apt-repository ppa:openjdk-r/ppa
sudo apt-get update
sudo apt install openjdk-11-jdk
|
3.3 keepalived installation
1
|
apt-get install keepalived
|
4. Reverse Proxy Practice
Use Nginx to proxy the tomcat server. My virtual machine ip is 192.168.2.5, and listen to port 9001 in the Nginx configuration file. At the same time, Nginx acts as a proxy for two ports 8080 and 8081 of tomcat. Create edu files and html files in 8080, create vod folders and html files in 8081, and access the two via 192.168.2.5:9001:/edu/a.html and 192.168.2.5:9001:/vod/a.html A tomcat server.

Mainly the configuration of nginx.conf, the following is the configuration instructions. There is also tomcat’s 8081 server configuration file to modify the default listening port 8080 to 8081.
 1
 2
 3
 4
 5
 6
 7
 8
 9
10
11
12
|
  server {
                 listen 9001;
                 server_name 192.168.2.5;

                 location ~ /edu/ {
                         proxy_pass http://127.0.0.1:8080;
                 }

                 location ~ /vod/ {
                         proxy_pass http://127.0.0.1:8081;
                 }
         }
|
Location ~ is used to determine whether it exists, and proxy_pass is used to point to the tomcat server. This block is configured in the http block of nginx.conf. Through this experiment, you can see the reverse proxy of Nginx. Nginx acts as a proxy for two tomcat servers, and users can access different servers only by accessing port 9001.
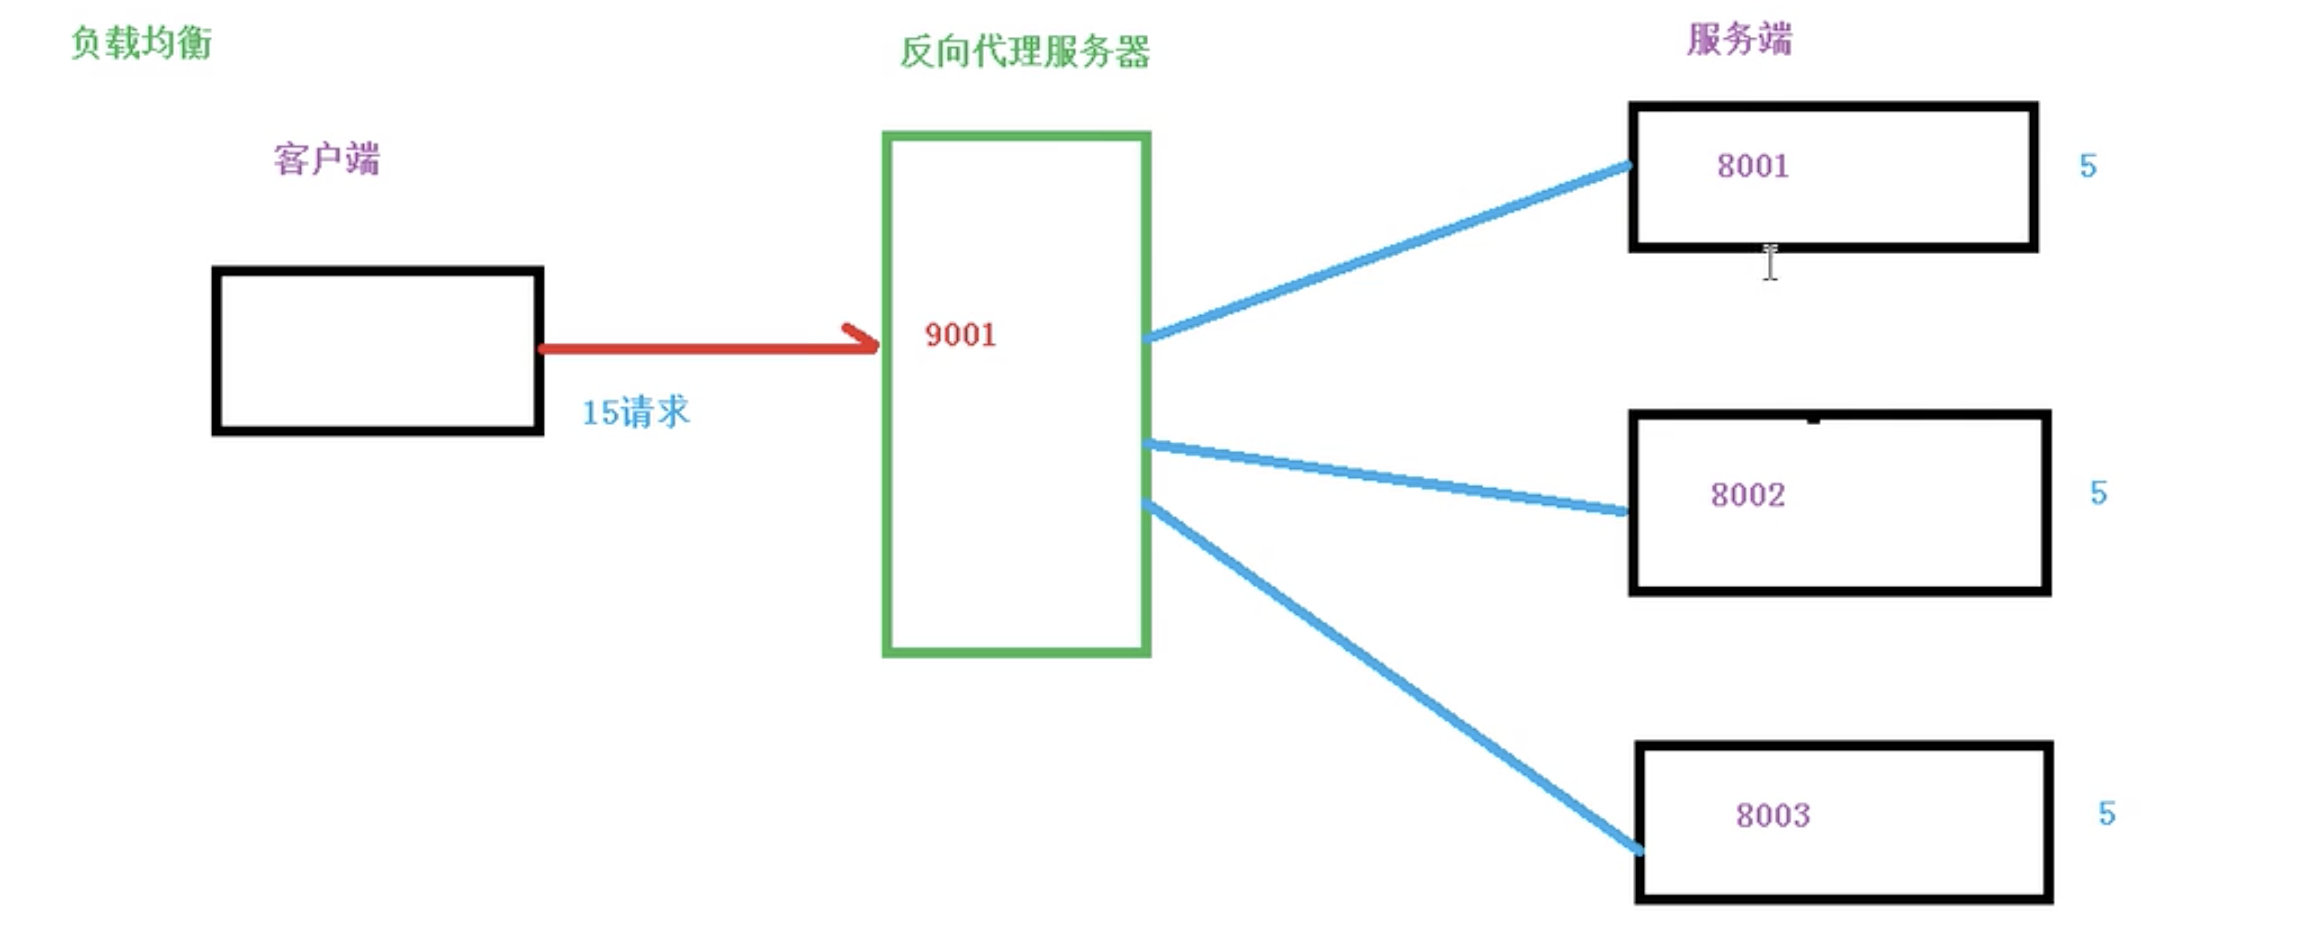
5. Load balancing
There are three configuration methods for load balancing, try each of them. This time, create an edu folder and a.html file for the server under 8081, and enter 192.168.2.5:80/edu/a.html in the browser to access different tomcat servers according to load balancing.
-
Polling
Each request is assigned to a different tomcat server one by one. Equivalent to equal opportunity. The configuration is as follows:
 1
 2
 3
 4
 5
 6
 7
 8
 9
10
11
12
13
|
 upstream myserver {
                server 192.168.2.5:8080;
                server 192.168.2.5:8081;
        }

        server {
                listen 80;
                server_name 192.168.2.5;

                location / {
                        proxy_pass http://myserver;
                }
        }
|
In this way, when a request comes, it will patrol to access the two tomcat servers.
-
weight method
Weights can be assigned to each tomcat server, and requests will dynamically fall to different servers with more weight.
 1
 2
 3
 4
 5
 6
 7
 8
 9
10
11
12
13
|
 upstream myserver {
                server 192.168.2.5:8080 weight=5;
                server 192.168.2.5:8081 weight=10;
        }

        server {
                listen 80;
                server_name 192.168.2.5;

                location / {
                        proxy_pass http://myserver;
                }
        }
|
After this configuration, the request will probabilistically fall to the two servers according to the weight.
-
Ip_hash method
This means that the request will only fall to the server accessed for the first time, and will not be changed to other servers. This can solve the session problem.
 1
 2
 3
 4
 5
 6
 7
 8
 9
10
11
12
13
14
|
upstream myserver {
ip_hash;
                server 192.168.2.5:8080 weight=5;
                server 192.168.2.5:8081 weight=10;
        }

        server {
                listen 80;
                server_name 192.168.2.5;

                location / {
                        proxy_pass http://myserver;
                }
        }
|
6. Separation of static and dynamic
This refers to distinguishing dynamic resources from static resources and placing them in different locations, such as database search, which belongs to dynamic resources and can be placed in tomcat, while static pages can be placed in nginx and accessed according to different directions these resources. It doesn’t work anymore.
7. High availability simulation
The high availability of Nginx means that two nginx servers are used as master-slave services. When the master server goes down, it can automatically switch to the slave server. The switching and monitoring of Nginx is realized by keepalived. A script will be defined in keepalived to monitor the status of nginx threads all the time. Once the status changes, it will switch to another slave server.
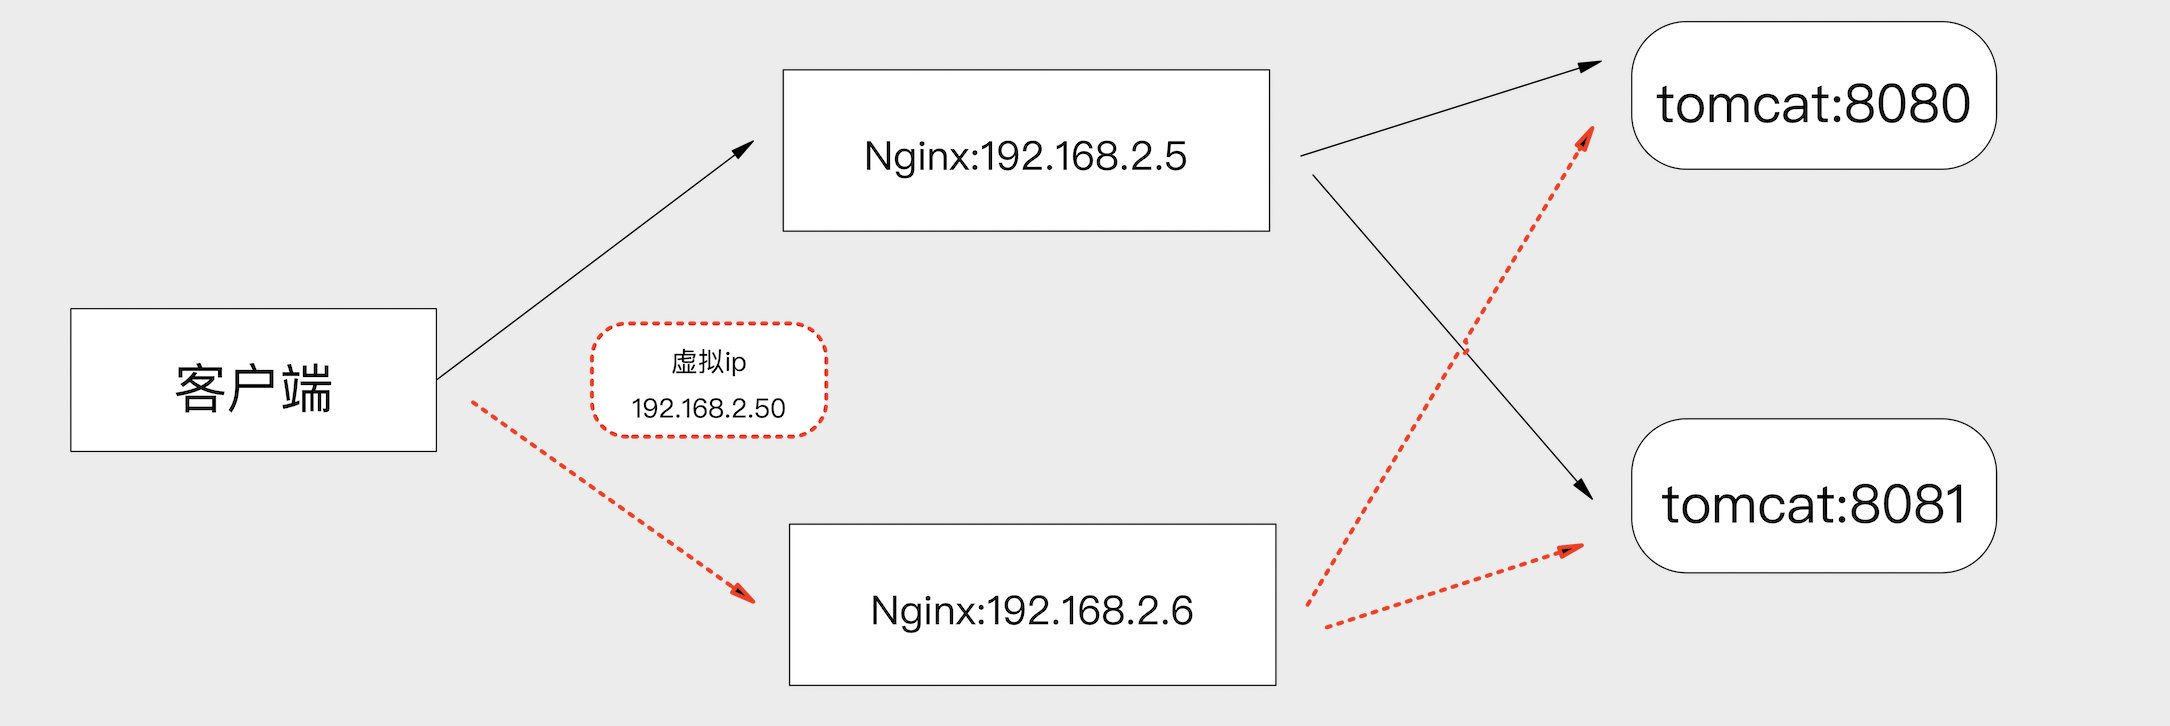
The above is the whole flowchart. The virtual ip 192.168.2.50 is a virtual ip set by keepalived. There is a nginx_check.sh script, which will run this script every 2s. This script is used to detect nginx threads. If there is no nginx The thread will kill the keepalive, and the service will be directed to the slave server. The slave server also needs the same configuration, just change the state to MASTER.
 1
 2
 3
 4
 5
 6
 7
 8
 9
10
11
12
13
14
15
16
17
18
19
20
|
vrrp_script chk_http_port {
         script "/etc/keepalived/nginx_check.sh"
         interval 2
         weight 2
}

vrrp_instance inside_VI_1 {
    state BACKUP #指定那个为master,那个为backup,如果设置了nopreempt这个值不起作用,主备考priority决定
    interface eth1 #设置实例绑定的网卡
    virtual_router_id 50 #VPID标记
    priority 90 #优先级,高优先级竞选为master
    advert_int 1 #检查间隔,默认1秒
    authentication { #设置认证
        auth_type PASS #认证方式
        auth_pass 111111 #认证密码
    }
    virtual_ipaddress { #设置vip
        192.168.2.50
    }
}
|
1
2
3
4
5
6
7
8
9
|
# !/bin/bash
A= 'ps -C nginx -no-header | wc -l'
if [ $A -eq 0 ];then
        /usr/sbin/nginx
        sleep 2
        if [ 'ps -C nginx --no-header | wc -l' -eq 0 ];then
                killall keepalived
        fi
fi
|
 1
 2
 3
 4
 5
 6
 7
 8
 9
10
11
12
13
|
upstream myserverkeepalived {
                server 192.168.2.50:8080;
                server 192.168.2.50:8081;
        }

        server {
                listen 80;
                server_name 192.168.2.50;

                location / {
                        proxy_pass http://myserverkeepalived;
                }
        }
|
Access through 192.168.2.50:/edu/a.html, by default, the nginx of the master is used. We can shut down the master’s nginx, and the service can still be accessed. At this time, the slave’s nginx is used.
8. Basic principles of Nginx
The architecture of Nginx is that the main process of a master starts as a daemon process, and multiple work processes are attached to the master process, as shown in the figure below. Each work process is equivalent to a reverse proxy server. Each work process competes to grab requests.
The benefits of this approach:
- Support hot deployment. When nginx.conf is changed, even if there are work processes processing transactions, it will not be affected. The config file will be synchronized to the work process that has not performed the transaction, and will be synchronized after the task is completed.
- Each work process can run independently without locking, saving the cost of locking.
The maximum number of connections supported by each work is 4, and it is best to keep the optimum number of workers consistent with the number of CPU cores.
9. Accessories
1)nginx.conf
  1
  2
  3
  4
  5
  6
  7
  8
  9
 10
 11
 12
 13
 14
 15
 16
 17
 18
 19
 20
 21
 22
 23
 24
 25
 26
 27
 28
 29
 30
 31
 32
 33
 34
 35
 36
 37
 38
 39
 40
 41
 42
 43
 44
 45
 46
 47
 48
 49
 50
 51
 52
 53
 54
 55
 56
 57
 58
 59
 60
 61
 62
 63
 64
 65
 66
 67
 68
 69
 70
 71
 72
 73
 74
 75
 76
 77
 78
 79
 80
 81
 82
 83
 84
 85
 86
 87
 88
 89
 90
 91
 92
 93
 94
 95
 96
 97
 98
 99
100
101
102
103
104
105
106
107
108
109
110
111
112
113
114
115
116
117
118
119
120
121
122
123
124
125
126
127
128
129
130
131
132
133
134
135
136
137
138
139
140
141
142
143
144
145
146
147
148
149
150
151
152
153
154
155
156
157
158
159
160
161
162
163
164
165
166
167
168
169
170
171
172
173
174
175
176
177
178
179
180
181
182
183
184
185
186
187
188
189
190
|
user www-data;
worker_processes 4;
pid /run/nginx.pid;

events {
        worker_connections 768;
        # multi_accept on;
}

http {

        ##
        # Basic Settings
        ##

        sendfile on;
        tcp_nopush on;
        tcp_nodelay on;
        keepalive_timeout 65;
        types_hash_max_size 2048;
        # server_tokens off;

        # server_names_hash_bucket_size 64;
        # server_name_in_redirect off;

        include /etc/nginx/mime.types;
        default_type application/octet-stream;

        ##
        # Logging Settings
        ##

        access_log /var/log/nginx/access.log;
        error_log /var/log/nginx/error.log;
root@monitor:/etc/nginx#
root@monitor:/etc/nginx#
root@monitor:/etc/nginx# cat nginx.conf
user www-data;
worker_processes 4;
pid /run/nginx.pid;

events {
	worker_connections 768;
	# multi_accept on;
}

http {

	##
	# Basic Settings
	##

	sendfile on;
	tcp_nopush on;
	tcp_nodelay on;
	keepalive_timeout 65;
	types_hash_max_size 2048;
	# server_tokens off;

	# server_names_hash_bucket_size 64;
	# server_name_in_redirect off;

	include /etc/nginx/mime.types;
	default_type application/octet-stream;

	##
	# Logging Settings
	##

	access_log /var/log/nginx/access.log;
	error_log /var/log/nginx/error.log;

	##
	# Gzip Settings
	##

	gzip on;
	gzip_disable "msie6";


	 upstream myserverkeepalived {
                server 192.168.2.50:8080;
                server 192.168.2.50:8081;
        }

        server {
                listen 80;
                server_name 192.168.2.50;

                location / {
                        proxy_pass http://myserverkeepalived;
                }
        }

	upstream myserver {
		server 192.168.2.6:8080;
                server 192.168.2.6:8081;
	}

        server {
		listen 80;
		server_name 192.168.2.6;

		location / {
			proxy_pass http://myserver;
		}
	}


        server {
		listen 80;
		server_name 192.168.2.6;

		location / {
			root html;
			proxy_pass http://127.0.0.1:8080;
 			index index.html index.html;
		}
	}

        server {

		listen 9001;
		server_name 192.168.2.6;

		location ~ /edu/ {
			proxy_pass http://127.0.0.1:8080;
		}

		location ~ /vod/ {
			proxy_pass http://127.0.0.1:8081;
		}
	}


	# gzip_vary on;
	# gzip_proxied any;
	# gzip_comp_level 6;
	# gzip_buffers 16 8k;
	# gzip_http_version 1.1;
	# gzip_types text/plain text/css application/json application/x-javascript text/xml application/xml application/xml+rss text/javascript;

	##
	# nginx-naxsi config
	##
	# Uncomment it if you installed nginx-naxsi
	##

	#include /etc/nginx/naxsi_core.rules;

	##
	# nginx-passenger config
	##
	# Uncomment it if you installed nginx-passenger
	##

	#passenger_root /usr;
	#passenger_ruby /usr/bin/ruby;

	##
	# Virtual Host Configs
	##

	include /etc/nginx/conf.d/*.conf;
	include /etc/nginx/sites-enabled/*;
}


#mail {
#	# See sample authentication script at:
#	# http://wiki.nginx.org/ImapAuthenticateWithApachePhpScript
#
#	# auth_http localhost/auth.php;
#	# pop3_capabilities "TOP" "USER";
#	# imap_capabilities "IMAP4rev1" "UIDPLUS";
#
#	server {
#		listen     localhost:110;
#		protocol   pop3;
#		proxy      on;
#	}
#
#	server {
#		listen     localhost:143;
#		protocol   imap;
#		proxy      on;
#	}
#}
|
- keepalived.conf
 1
 2
 3
 4
 5
 6
 7
 8
 9
10
11
12
13
14
15
16
17
18
19
20
21
22
23
24
25
26
27
28
29
30
31
32
33
34
35
36
37
38
39
40
41
42
43
44
45
46
47
48
49
50
51
52
53
54
55
56
57
58
59
60
61
62
63
64
65
66
67
68
69
70
71
72
73
74
75
76
77
78
79
80
81
82
83
84
85
86
87
88
89
90
91
92
93
94
|
global_defs {
   notification_email {  #指定keepalived在发生切换时需要发送email到的对象,一行一个
		monitor@3evip.cn
   }
   notification_email_from monitor@3evip.cn #指定发件人
   smtp_server stmp.3evip.cn #指定smtp服务器地址
   smtp_connect_timeout 30 #指定smtp连接超时时间
   router_id LVS_DEVEL #运行keepalived机器的一个标识
}

vrrp_sync_group VG_1{ #监控多个网段的实例
	group {
		inside_network #实例名
		outside_network
	}
	notify_master /path/xx.sh #指定当切换到master时,执行的脚本
	netify_backup /path/xx.sh #指定当切换到backup时,执行的脚本
	notify_fault "path/xx.sh VG_1" #故障时执行的脚本
	notify /path/xx.sh
	smtp_alert #使用global_defs中提供的邮件地址和smtp服务器发送邮件通知
}

vrrp_script chk_http_port {
	script "/etc/keepalived/nginx_check.sh"
	interval 2
	weight 2
}

vrrp_instance inside_VI_1 {
    state BACKUP #指定那个为master,那个为backup,如果设置了nopreempt这个值不起作用,主备考priority决定
    interface eth1 #设置实例绑定的网卡
    virtual_router_id 50 #VPID标记
    priority 90 #优先级,高优先级竞选为master
    advert_int 1 #检查间隔,默认1秒
    authentication { #设置认证
        auth_type PASS #认证方式
        auth_pass 111111 #认证密码
    }
    virtual_ipaddress { #设置vip
        192.168.2.50
    }
}
virtual_server 192.168.36.99 80 {
    delay_loop 6 #健康检查时间间隔
    lb_algo rr  #lvs调度算法rr|wrr|lc|wlc|lblc|sh|dh
    lb_kind DR  #负载均衡转发规则NAT|DR|RUN
    persistence_timeout 5 #会话保持时间
    protocol TCP #使用的协议
    persistence_granularity <NETMASK> #lvs会话保持粒度
    virtualhost <string> #检查的web服务器的虚拟主机(host:头)
    sorry_server<IPADDR> <port> #备用机,所有realserver失效后启用
	real_server 192.168.200.5 23 {
            weight 1 #默认为1,0为失效
            inhibit_on_failure #在服务器健康检查失效时,将其设为0,而不是直接从ipvs中删除
            notify_up <string> | <quoted-string> #在检测到server up后执行脚本
            notify_down <string> | <quoted-string> #在检测到server down后执行脚本
			TCP_CHECK {
				connect_timeout 3 #连接超时时间
				nb_get_retry 3 #重连次数
				delay_before_retry 3 #重连间隔时间
				connect_port 23  健康检查的端口的端口
				bindto <ip>
			}
			HTTP_GET | SSL_GET{
				url{ #检查url,可以指定多个
						path /
						digest <string> #检查后的摘要信息
						status_code 200 #检查的返回状态码
				}
				connect_port <port>
				bindto <IPADD>
				connect_timeout 5
				nb_get_retry 3
				delay_before_retry 2
			}

			SMTP_CHECK{
					host{
						connect_ip <IP ADDRESS>
						connect_port <port> #默认检查25端口
						bindto <IP ADDRESS>
					}
					connect_timeout 5
					retry 3
					delay_before_retry 2
					helo_name <string> | <quoted-string> #smtp helo请求命令参数,可选
			}
			MISC_CHECK{
					misc_path <string> | <quoted-string> #外部脚本路径
					misc_timeout #脚本执行超时时间
					misc_dynamic #如设置该项,则退出状态码会用来动态调整服务器的权重,返回0 正常,不修改;返回1,检查失败,权重改为0;返回2-255,正常,权重设置为:返回状态码-2
			}
    }
}
|
3 ) nginx_check.sh
1
2
3
4
5
6
7
8
9
|
# !/bin/bash
A= 'ps -C nginx -no-header | wc -l'
if [ $A -eq 0 ];then
	/usr/sbin/nginx
	sleep 2
	if [ 'ps -C nginx --no-header | wc -l' -eq 0 ];then
		killall keepalived
	fi
fi
|


